
Organized TINY Kitchen: How To Function in a Small Space
What do you need to make a tiny kitchen work? It needs to be an ORGANIZED tiny kitchen, intentionally planned to suit your individual cooking style. These are my five strategies for living and cooking (for a family of four) in a tiny organized kitchen:
- Create Work Zones
- Plan storage around Work Zones if possible
- Get creative with additional work space (trolley, table, etc)
- Minimize unnecessary stuff in the work zone
- Prioritize aesthetic appeal of visible storage
Cooking in a tiny kitchen is hard! It requires pairing down gadgets and expectations, and maximizing the space creatively to keep it organized and functional. As with most things about living in a small space, it pays to be intentional. I’ve found identifying work zones and cleverly organizing our kitchen equipment around those zones helps immensely. As does minimizing stuff in general and things out on the counter top, specifically. And, an extra effort to keep things tidy and put away REALLY helps as well.
Of course, it is still a small space! And with that, there is shuffle of stuff almost constantly while cooking. But eventually – at least for me – it’s morphed from being a frustrated flailing to a defined dance.
This post may contain affiliate links, which means I make a small commission at no extra cost to you. See my full disclosure here.
Step 1: Create Work Zones Within Your Tiny Kitchen To Help It Stay Organized
In our kitchen, we have a cooking zone, a dishes/clean up zone, and a prep/chopping zone. We also have a toaster station. And a magic bullet blender + coffee making station (we LOVE our magic bullet blender!).
These zones work well for our use of our kitchen. We do a lot of cooking, we don’t have a dishwasher, and we make smoothies and homemade lattes with our magic bullet almost daily. It makes sense to have designated spaces for each of our daily tasks in the kitchen.
However, since our kitchen is tiny, we have some overlap. For example, the toaster station is basically in the same spot as the cooking station. But, we usually aren’t cooking something AND toasting bread at the same time (that might be different than some people’s kitchen habits, but that is ours!). Also, our prep/chopping station is usually where our magic bullet/coffee station is, so we just have to do one at a time.
This system developed rather organically. We found ourselves using the same chunks of counter space for different things, but then we intentionally organized our kitchen’s storage around our counter usage.

Step 2: Organize and Plan Storage In Your Tiny Kitchen Around Work Zones
Once we had lived in our kitchen a bit (actually a long bit, it was an embarrassingly long time before we intentionally organized our kitchen… like 2 years!), we pulled all our stuff out from its various spots to identify, “Where does it make the most sense to store this if we use THIS spot for a specific task?”
Obviously, this can be limited by storage space! But for us, we shuffled some things to make more sensible storage options to keep our kitchen organized. Our coffee making stuff stopped living across the kitchen. We moved it to where we always make coffee. Our magic bullet stuff also came out of a random cupboard. We moved it to a drawer below the magic bullet station. Our knife rack was already in place at that point, but if I had it to do over, I’d put the knife rack next to the chopping/prep spot. The dishes I used for our daughter’s snacks went to the main prep area, where I always prep their snacks.
Getting your storage for specific tasks as close as possible to where those tasks happen really helps streamline work and maintain an organized kitchen.

Step 3: Get Creative With Additional Work Space in your Tiny Organized Kitchen
Our lack of counter space (we have about 8 feet square) was the hardest part of the kitchen.
For awhile we lived with the way our kitchen was set up when we moved into the apartment. It would have been fine for a Granny making meals for herself. (That was the intention of the little flat). However, it really wasn’t ideal for my cooking style. I like to be able to talk to people while I cook. And since I make all our meals at home, I’m in the kitchen a LOT of my day. So we moved the fridge, which opened up an extra spot right next to our main prep spot. Then I invested in a kitchen trolley to provide a bit of extra counter space.
My husband also switched out our glass table top for a homemade wood table top. Then I could put hot things down on the table (with a hot pad) without worrying about the table shattering.
These two little changes made a big difference on the functionality of our kitchen space.

Step 4: Minimized Unnecessary Stuff in the Work Zone(s) to Keep Your Kitchen Organized
As we began reorganizing our kitchen’s storage, I decided my goal was to get stuff off the counter every night. (The exception was the dish rack, the soap, and the fruit storage – those stayed permanently on the countertop.) I didn’t want the toaster, the blender, or anything living on the counter top. It does required an extra step when I wanted to make toast in the morning. But, I wanted to make sure I had every square centimeter of counter space available for being, well, counter space!
The toaster, the blender, and the crockpot (my three most frequently used kitchen gadgets) have homes inside a cupboard. I also made sure my cooking utensils had a home that wasn’t on the countertop. And our knives already lived on the wall, rather than in a knife block on the counters.
When the counter space is as open as possible, it helps me feel like my tiny kitchen space is bigger. Also, having everything have a home helps me keep my kitchen organized. It limits my ability to bring more stuff into the kitchen!
Step 5: Prioritize Aesthetic Appeal of Visual Storage in Your Tiny Organized Kitchen
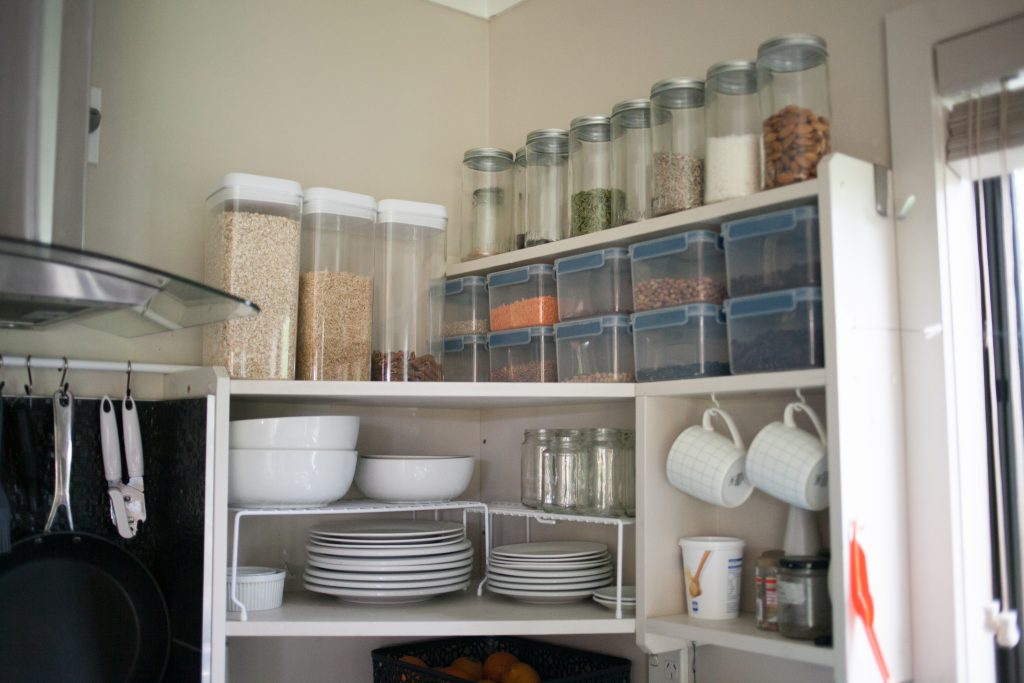
Our kitchen had some cupboards, but it also had some open shelving. For awhile, we didn’t put a lot of thought into what went on our open shelves. And then, when I started putting pantry staples on the open shelves, I used recycled jars of various sized, with various colored lids. The only really intentional thing I did was take the labels off! But then the color of what was in the jars, the varying heights of the jars, and the interspacing of jars with various other things began to bug me.
When I sat across the room and looked at the kitchen, it was not peaceful. And I am someone that NEEDS to have visual peace around me to cope!
So I asked a friend if she had any suggestions for how I could organize my kitchen better. She pointed out how getting jars the same height and with the same lids might help me. That started my mission to make my open shelves PRETTY (OK, well, maybe not pretty, but at least peaceful!).
I invested in tall jars to maximize the top shelf’s vertical space. I invested in matching click-top food storage bins that perfectly fit the space configuration of the second shelf. And I moved all my white plates and bowls or clear glassware to one of the shelves to bring more visual uniformity to the space
It made a big difference! I had a very functional open shelf area, AND it was peaceful. Well, at least as peaceful as a tiny kitchen can be!

A Tour of My Organized, Tiny Kitchen:
Since I’m a visual person, I always love to see how people ACTUALLY have arranged their home. I’ve never been to an open house (like, when people are selling a home), but I think I’d spend all my time looking around wanting to know what is inside the cupboards.
So, I’m going to share how I’ve organized our kitchen. And as it is applicable, I’ll share why I keep stuff in certain places. I hope it is helpful for you to identify ways you might be able to make your kitchen function smoothly – regardless of the size!
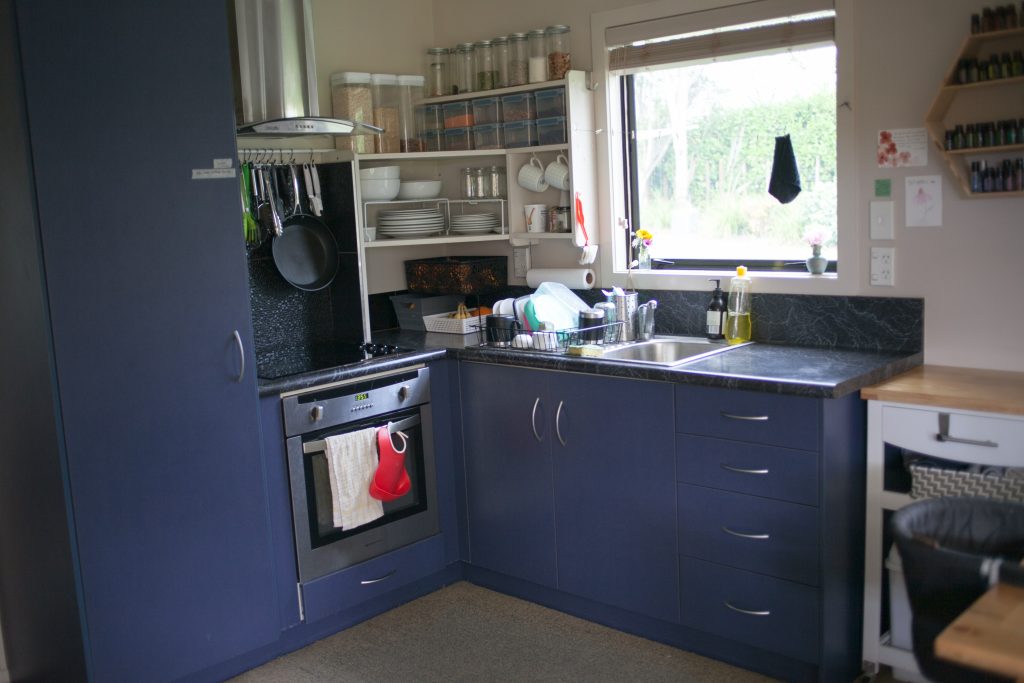
Stop 1: The Prep Zone (and Smoothie Zone and Coffee Zone), and It’s Close-Proximity Storage:
The main counter space/work zone in the kitchen is to the right of the sink, closest to the dining table. There is a plug located here. Since this is a small space, as I mentioned, I bought a “kitchen bench prep trolley” at Kmart last year. When I put it together, I left off the bottom shelf and the wire fruit rack. I put our rubbish bin and recycling bin tucked inside instead. There are two hooks on the sides of the trolley where my girls’ drink cups “live.” And the drawer is our pens/pencils, loose papers, and my weekly planning book’s home.
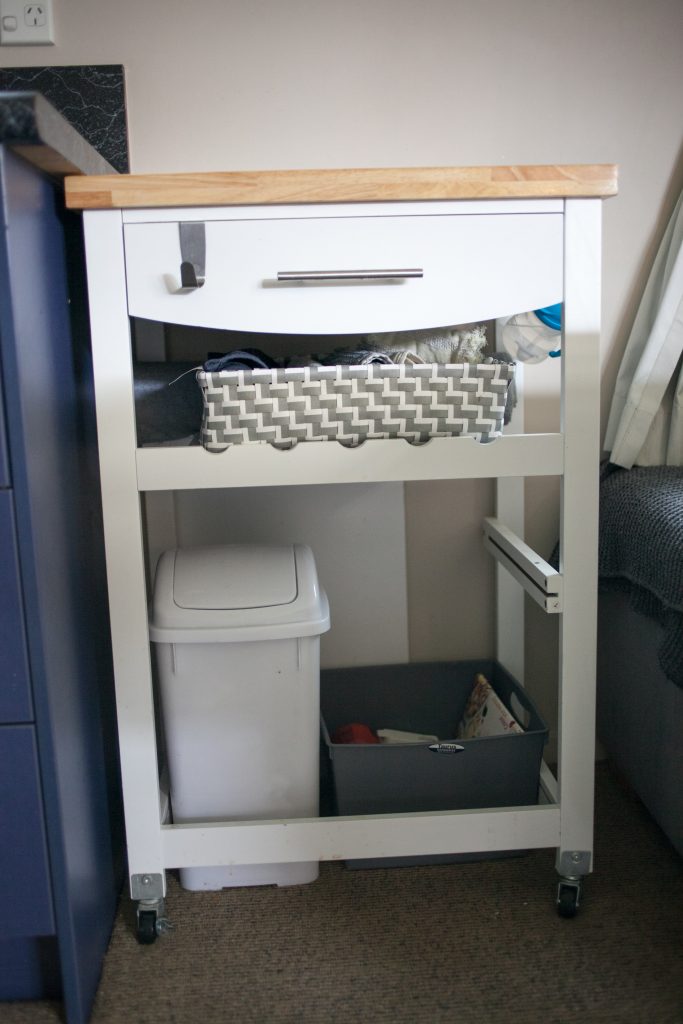
Gabe sealed the top of the trolley with a heavy-duty varnish so that it would be more water-resistant. This was a very good choice, as the trolley gets a LOT of daily use.
Having the extra 2 square feet of counter space makes a HUGE difference – if the stove top is in use, Gabe will sometimes set up the toaster and have a toast station there while I’m making smoothies on the main counter prep area, or I can put my compost bucket there as well as a mixing bowl and use the main counter prep area for chopping pumpkins for dinner prep… It was a really good move.
Next to the trolley are the four main drawers that our kitchen came equipped with. The top drawer has our cutlery in it. The second drawer has our cloth napkins, face cloths for the kids (usually more than what is pictured – we had several in the laundry circulation when I snapped the photos!), and a few utensils. It used to have more utensils, but I hung my utensils not too long ago.
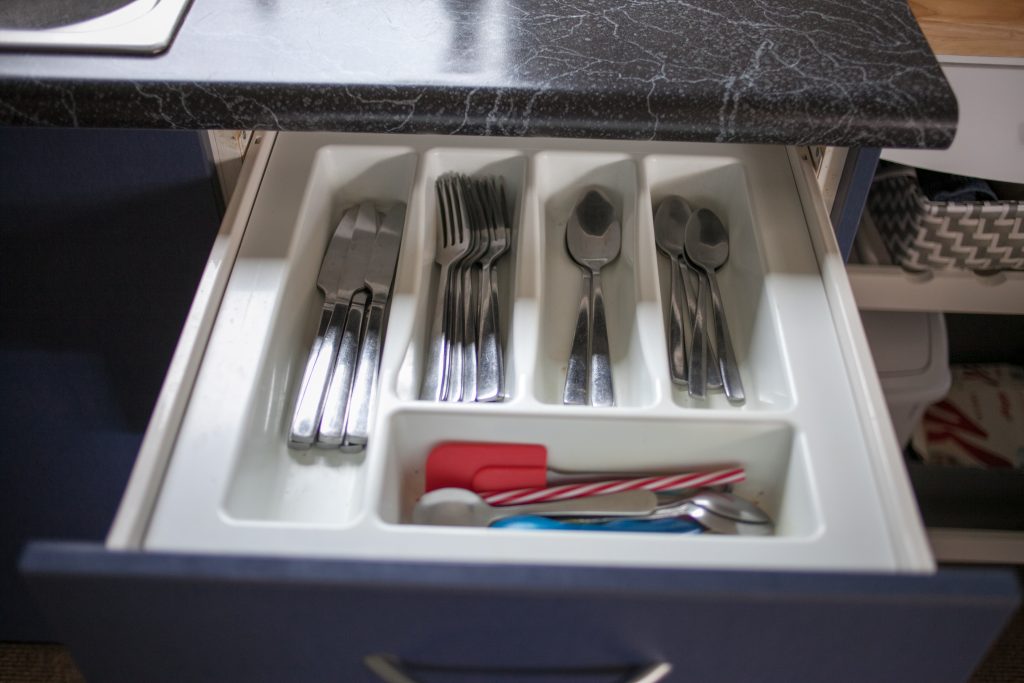

The third drawer is sectioned off. I have coffee-prep stuff in one section. This includes the aero-press and a jar with coffee grounds. I have smoothie-making stuff in another section. This includes the magic bullet cups, blades, and lids. And I have the girls’ plates, bowls, cups, lids, and cutlery in another section. The last section has some random stuff. There are rubberbands (a favorite for my kids to dump out and throw all over the floor), random screws, and little odds and ends gadgets or hardware that I don’t know where to put.
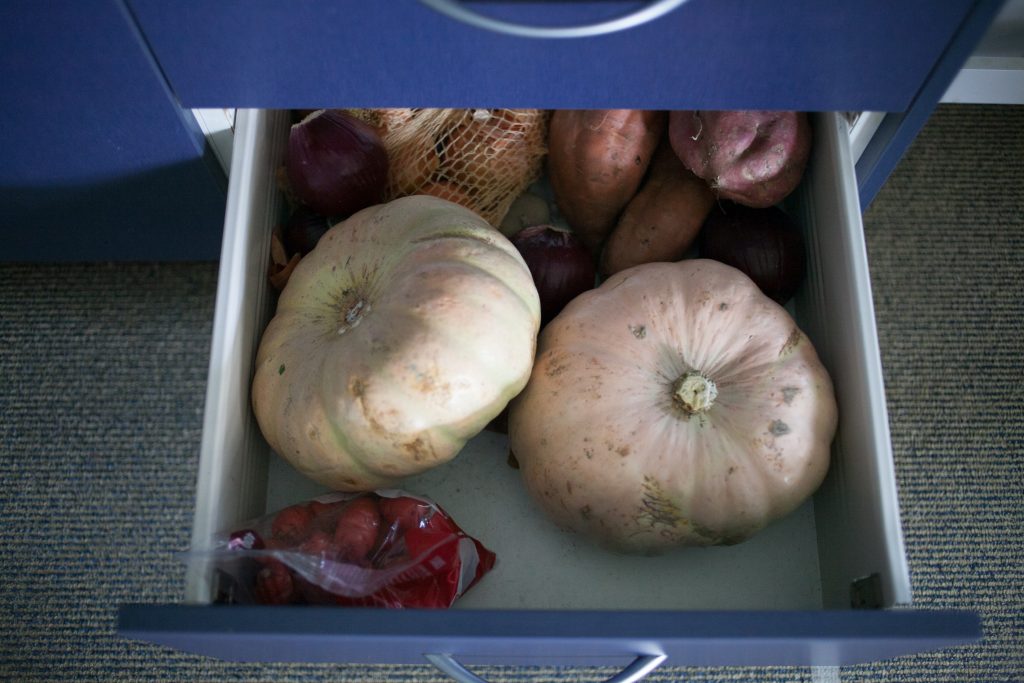
And the fourth drawer is where I put my onions, potatoes, sweet potatoes, and pumpkin.
Having most of the magic bullet equipment, the coffee making equipment, and the girls’ snack dishes all work perfectly here in the main prep area, and they help this part of the kitchen stay organized and functional.
Stop 2: The Dish Washing/Dish Drying/Clean Up Zone, and It’s Close Proximity Storage
Continuing along the kitchen, there is the skink and the under-the-sink cupboard. On the top shelf of this cupboard I keep my food wraps and zip-bags. The bottom shelf actually has our weights for working out – no, that’s not mandatory for an organized kitchen! We just keep them here because our morning workouts are in our main room, so one of us ends up being right next to this cupboard! On the inside of the cupboard door is a wire basket. I keep cutting boards and produce bags there.
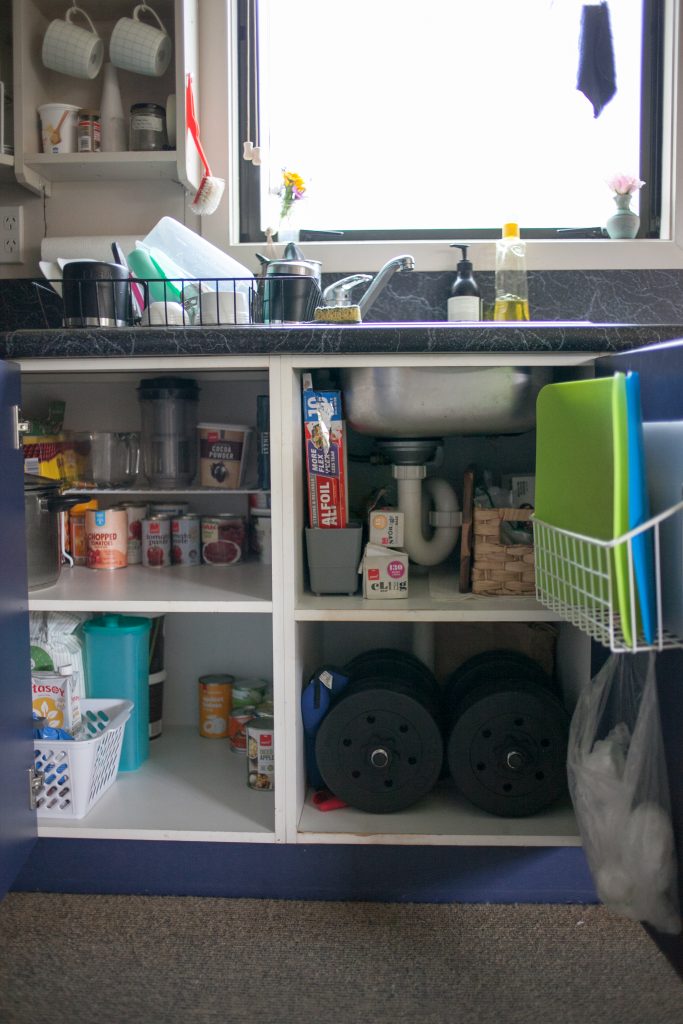
The next cupboard over holds pantry items. I keep my canned goods here, along with other shelf-stable food supplies. In the back corner of this cupboard, which is the corner of the kitchen, there is a box with some stuff I never use. Again, not mandatory for an organized kitchen – in fact, I wouldn’t recommend keeping stuff you never use! But our flat is a furnished flat, so some of the kitchen gadgets aren’t in my normal rotation of use. I store them back there out of sight in the most inconvenient-to-access spot. Also, the flat came equipped with kitchen knives and a knife block. We hung a magnetic strip and use our own knives, so the knives and the block aren’t needed. I also stash extra aluminum casserole dishes and a bucket with extra bulk spices back there.

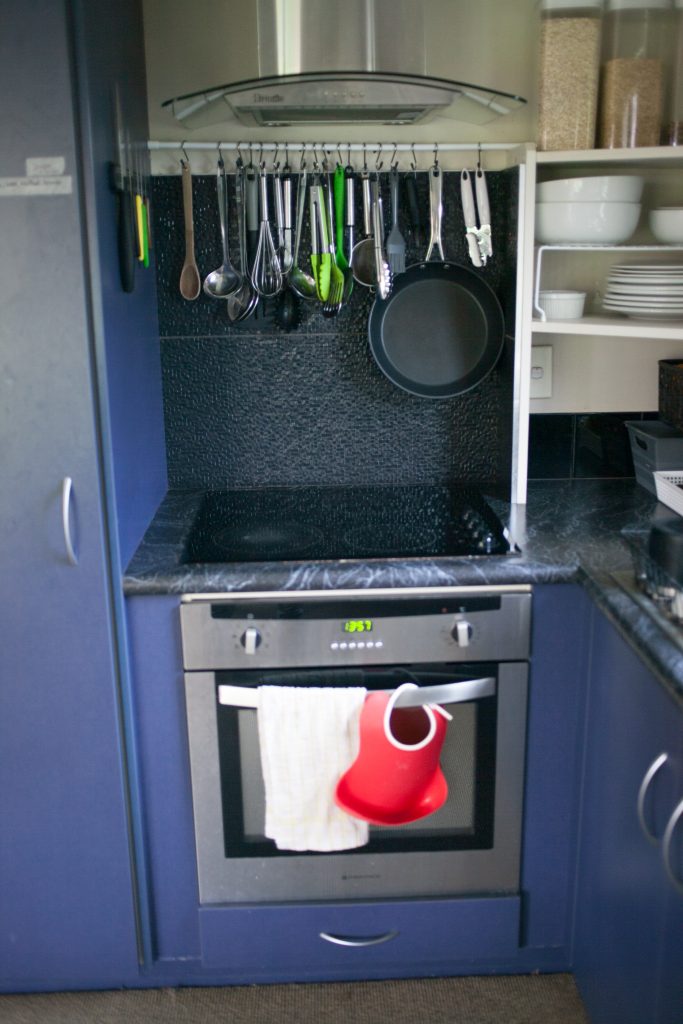
Stop 3: The Cooking Zone/Toast Station/Fruit Storage/Secondary Prep Zone/Slow Cooker Zone
Moving along the L of the kitchen, is the corner with the fruit storage in it (the corner is a difficult place to utilize, so it works well for storing fruit). This also is where another plug is located, so tucked into the corner is where we usually put our toaster when we’re toasting things. The stove top is glass, so when we aren’t cooking, this becomes a good secondary prep area. I also usually set my slower cooker on top of the stove top when I’m cooking with that gadget.
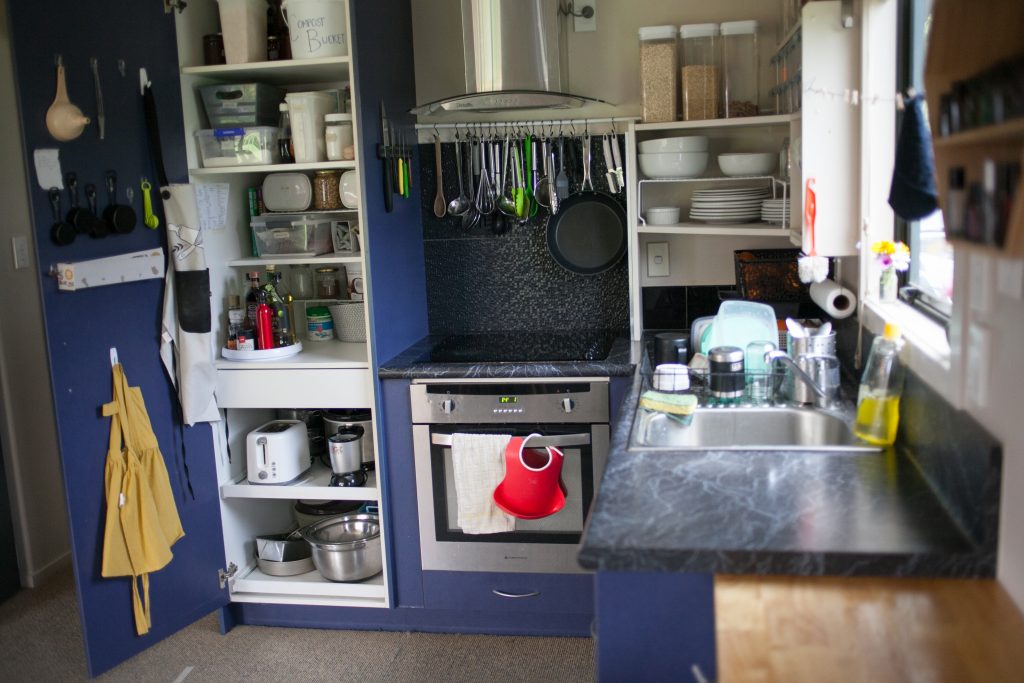
The toaster and the slow cooker are both immediately to the left of the stove top in the tall pantry cupboard, so they live close to where their work zones are. As I mentioned, this is also where the knives live, and the cutting boards are just one zone over (under the sink), so it’s easy to utilize this space for a secondary prep zone as well.
Under the oven is another drawer, were we keep our baking sheets and muffin tins.
Stop 4: The Tall Pantry Cupboard Bottom Half:
Next to the oven is a tall cupboard. I’ve hung command hooks on the door to keep things vertically. I hang my apron and my daughter’s apron here, I have rigged up my baking paper box here, and I have my measuring cups, measuring spoons, funnel, and straw cleaners here too.
It is way easier for me to open the cupboard door and tear off baking paper (which I use a lot of, as I try to minimize the oil amount I use) than to open a drawer, pull out the baking paper box and put it on the counter, tear it off, and replace it to the drawer. I’ve mounted mine with two command hooks with a straight twig/tree branch from my yard between the hooks, and a bit of blue tack to hold the stick in place. I poke holes in each end of my baking paper box and thread the wood stick through the holes, and then rest the ends of the stick on the hooks.
(I didn’t come up with this idea on my own: I saw it on this genius video about Command Hook Hacks by Kallie Branciforte of But First, Coffee.)

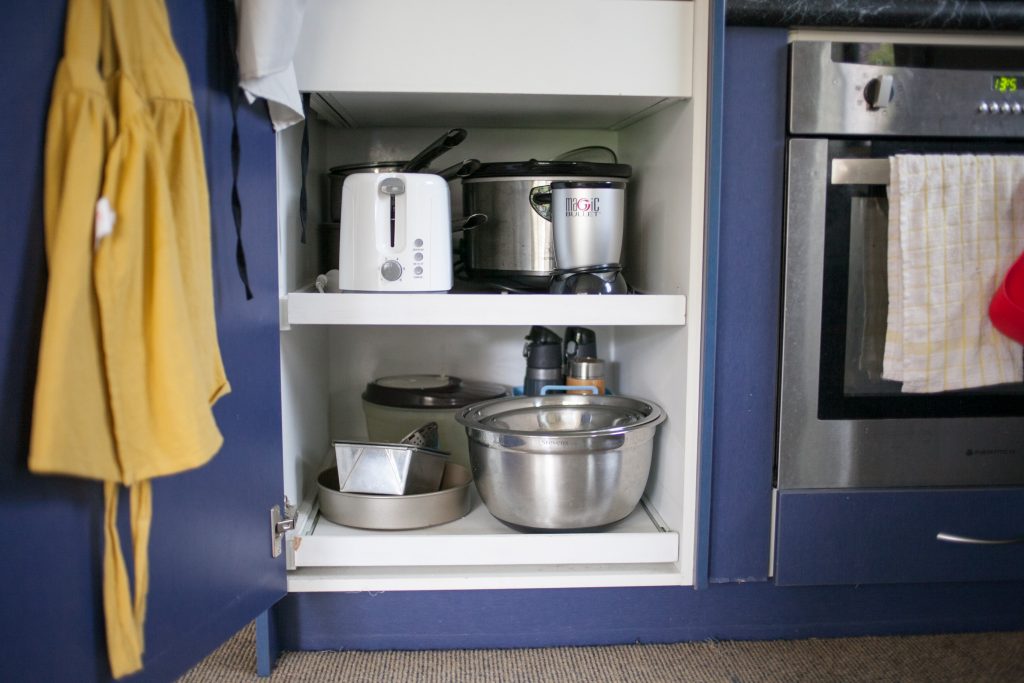
On the bottom shelf of this cupboard (a pull-out shelf) is my mixing bowls, my salad spinner, my bread loaf pans, and a small container that holds our four travel cups/individual thermoses. Two of the travel cups are for coffee, and two are for tea, since tea tastes gross if it is drunk from a coffee-smelling cup!
The next shelf up (also a pull-out shelf) is where our toaster, our magic bullet engine, our crockpot, and my three sauce pans (a 6 inch, 8 inch, and 10 inch – these came furnished with the apartment. I think I could do fine with just two) and lids live.
Above that is a drawer where I store all my spices. I’ve saved crushed garlic jars and other small jars, and try to buy my spices in bulk. I refill the jars with the bulk spices as needed. I’ve organized them according to the flavor profile and use that I typically group them mentally. I keep my herbs together – dill, rosemary, oregano, etc. I keep my Mexican-inspired spices together: garlic, onion, cayenne, cumin, paprika. Those meld into my main Indian spices – curry and coriander. And those merge into my baking spices: cinnamon, nutmeg, allspice, etc. I also keep stock cubes, extra vanilla or almond extract, and bay leaves tucked into the back of this drawer.
Stop 5: Tall Pantry Cupboard Top Half:
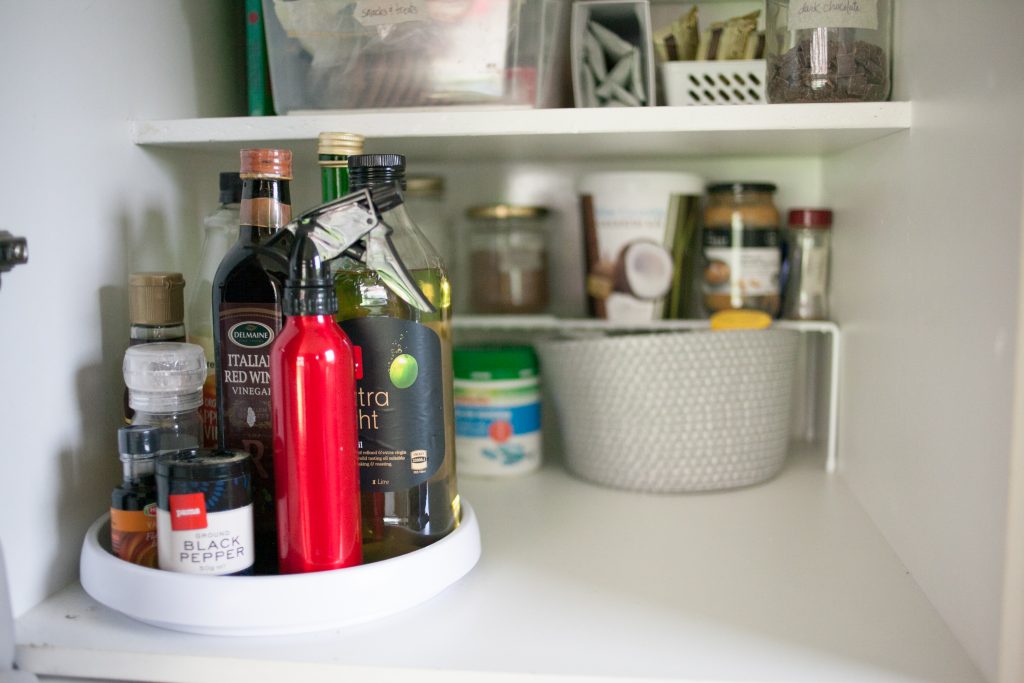
Next up is my tallest shelf, which is where I keep a lazy susan with oils and vinegars, salt and pepper. I also have a basket with my vitamins and supplements on this shelf. And I have a shelf extender to provide a slightly elevated spot for common toast toppings in our house – coconut oil and peanut butter.

The fourth shelf up is my snack shelf. I have a bin with a lid for chocolate bars, granola bars, raisin boxes (when I get them) and other random, not necessarily staple, snacks. I also have a container for salted peanuts, rice cakes, and pretzels. These are my go-to snacks for my kids when I’m running out the door.

The fifth shelf is my baking shelf. I have a lidded bin with flour. I also have a lidded bin with sugar. There’s also a jar of salt, and an open-top bin with random baking supplies, such as muffin cups, chocolate chips, etc. At the back of this shelf I have another shelf extender/portable wire shelf, with jars on it containing my common baking ingredients: baking soda, baking powder, molasses, corn flour, arrowroot starch, etc. The chocolate chip jar is supposed to live here too, but I’m potty training my daughter at the moment… I totally use a chocolate chip reward system for every poo and pee that ends up in her little toilet. It’s working, so I’m happy with it! As a result, my chocolate jar is often out on the counter top for a visual reminder for her!

The top shelf in this cupboard is where I keep my compost bucket when it’s not in use. Behind the compost bucket, a basket lives with “restocks” of seeds and nuts. Currently, there is a tupperware cereal container full of corn flakes (someone gave us a HUGE box, so we’re working our way through them…). And behind the corn flakes I keep the jars of applesauce and jam that I’ve made.

Stacked on top of this shelf is a big stock pot that I rarely use except for when I’m canning, and a cardboard box full of jars and lids for canning (actually, only as many as would fit in my allocated shelf space, so probably not full!). I also have a cardboard box behind the jars box with some random picnic supplies – paper cups, a small insulated lunch box, wooden spoons, and a table cloth. And in the back corner I keep my supply of extra paper towels. We don’t go through paper towels that fast, so a package of four rolls usually lasts me several months, and I wanted a storage spot well out of the way.
Stop 4: Out-in-the-open storage:
On the side of this cupboard, above the stove top, is our magnetic strip with our knives.
And across the back of the stove, above the stove top, I’ve hung a suspension curtain rod between the big tall cupboard and the wall at the corner of the kitchen. I have S hooks on the rod, and this is where I hang most of my cooking utensils – wooden spoon, whisk, ladle, pancake turners, can opener, etc. I also hang my one frying pan here.
Next to that, in the corner, the kitchen features exposed shelves. Three tall containers keep our oats, rice, and pasta in them. Across the topmost shelf is 8 tall jars for nuts, seeds, and dried fruit. Under those jars is a shelf where I’ve got 10 snap-top matching plastic square containers that perfectly fit the depth and height of the shelf. This is where I keep my dried beans, polenta (cornmeal), barley, and some more dried fruit.
Under that, I have a shelf that is the home of our plates and bowls of various sizes, and the glass jars we use for drinking glasses. And next to that shelf is another little cubby shelf where we keep honey, sprinkles, and ground seeds to add to oatmeal, a roll of masking tape, and a fine-point sharpie pen… You know, everyday essentials (for us, at least!). At the top of this cubby shelf I hang two mugs. The rest of the mugs are over in our drink station inside the closet across the room – which you can read about and view photos of on my post about Minimalist Family Living: Organized Living and Dining Room in a Small Space.
I have three different types of containers up there on those shelves, but as I mentioned above, they look cohesive and aesthetically pleasing because they’re grouped together with the other similar containers and they have a similar-enough color scheme. Honestly, I would have preferred clear plastic or glass square containers with a metal or white lid for my dried beans, but I measured the shelf space and chose the containers (Kmart!) that best fit the space.
Conclusion Of My Organized Tiny Kitchen Tour:
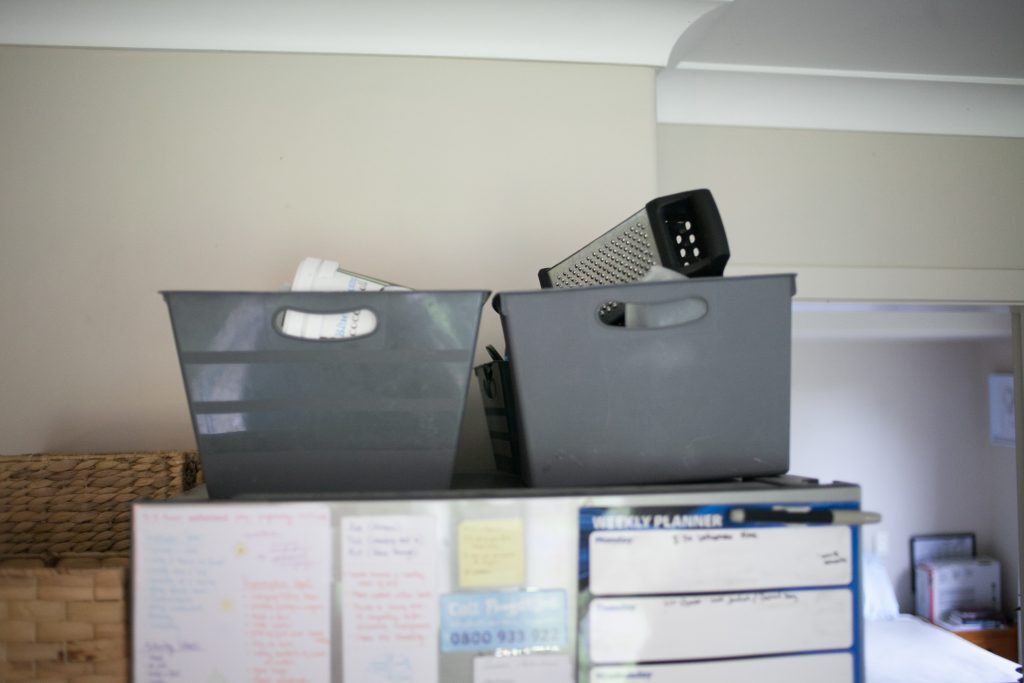
On top of our fridge, we have several bins for holding our food storage containers, lids, and less-frequently used gadgets like a lemon juicer and grater.
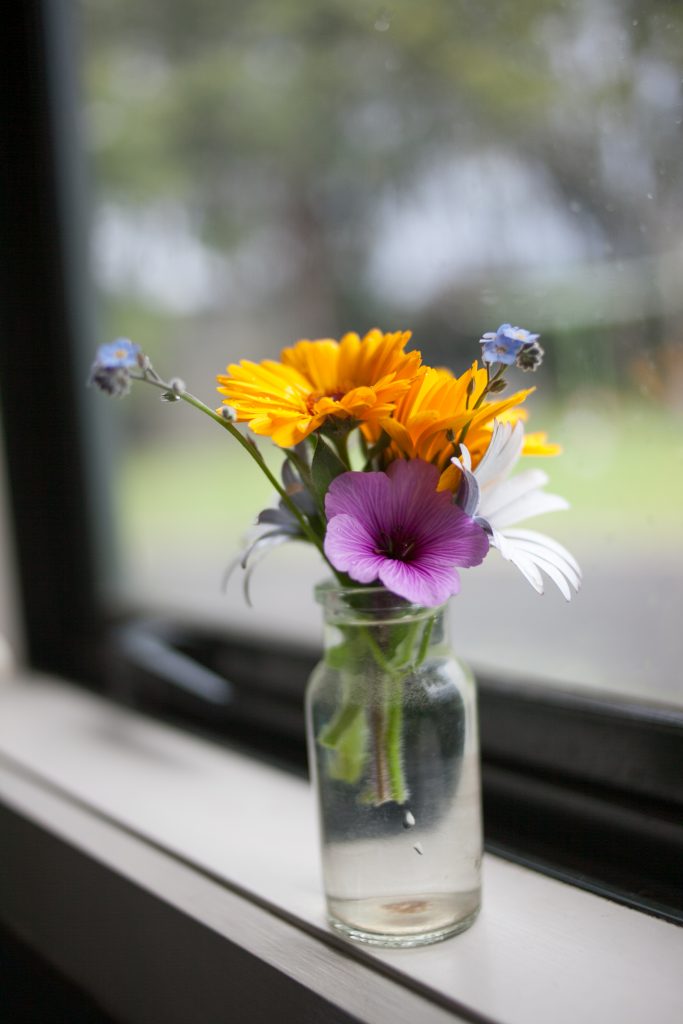
I also use my window space: I have vases with flowers on my kitchen window sill. And honestly, everything looks better with fresh cut flowers, right? I also have strung a piece of twine between two command hooks on each side of my window. This is where I hang my zippy bags to dry (using mini wooden clothes pins). I don’t throw them away if they haven’t contained raw meat or something rotting. I wash and rinse and hang-dry instead. And I also hang the cloth I use to wipe my kids’ hands and face between meals up there.

And that’s my kitchen! It’s small, but it’s well organized for how we use it, and it’s very functional for making our meals, so I’m happy with it!
Your turn: do you live in a small kitchen? Is it an organized small (or tiny!) kitchen? Do you regularly COOK in a small kitchen? How have you maximized your space? And if you have a bigger kitchen, what would be your non-negotiable if you moved to a small kitchen? How do you organize you cooking space?
I’d love to hear from you in the comments below! Please share you tips and tricks so I can learn from you!